MCP Server by Python, config in Cursor
2024年11月25日,Antrophic 提出 MCP(Model Context Protocol,模型上下文协议),提供Agent Tool call(工具调用)的统一格式。直至2025年4月9日,Google 官宣另一个Agent领域的协议A2A(可参考笔者另一篇介绍 A2A——Agent2Agent 的文章),并正式官宣支持 MCP,至此,MCP已成为业界公认的范式,一定程度上实现它所提出的”大模型领域的USB-C”的口号。
MCP主要分为几个组件:MCP Hosts(LLM Web, Desktop),MCP Clinet,MCP Server。对于开发者而言,如何把已有的功能代码按照MCP框架打包成MCP Server是适应MCP的关键步骤。
当前Cursor,Trae等主流大语言模型辅助代码编辑器早已正式支持MCP的配置,这里笔者在 Windows 中以Python搭建简易的MCP Server,并进行Cursor配置。采用的样例是MCP官方文档提供的天气查询demo。
MCP Server 代码编写
uv 是一种新型的 python 环境管理器,已成为各大开源项目 python 配置管理的新潮流,参照官方文档的介绍,这里也使用 uv,具体安装方法参考 uv 官方文档。
新建项目文件夹
1
2
3
4
5
6
7
8
9
10
11
12
13
# Create a new directory for our project
uv init weather
cd weather

# Create virtual environment and activate it
uv venv
.venv\Scripts\activate

# Install dependencies
uv add mcp[cli] httpx

# Create our server file
new-item weather.py
Part1: MCP head config
1
2
3
4
5
6
7
8
9
10
11
## Part1 Config
from typing import Any
import httpx
from mcp.server.fastmcp import FastMCP

# 初始化 MCP Server,这里命名为"weather",和后续的配置要对应
mcp = FastMCP("weather")

# 工具调用访问的 Url
NWS_API_BASE = "https://api.weather.gov"
USER_AGENT = "weather-app/1.0"
Part2: 准备基础功能函数(直接url请求)
1
2
3
4
5
6
7
8
9
10
11
12
13
14
15
16
17
18
19
20
21
22
23
24
25
26
27
## Part2 Functions
async def make_nws_request(url: str) -> dict[str, Any] | None:
    """Make a request to the NWS API with proper error handling."""
    # 响应头
    headers = {"User-Agent": USER_AGENT, "Accept": "application/geo+json"}
    # 异步获取响应
    async with httpx.AsyncClient() as client:
        try:
            # 这一步是发送 url 的核心
            response = await client.get(url, headers=headers, timeout=30.0)
            response.raise_for_status()
            return response.json()
        except Exception:
            return None


def format_alert(feature: dict) -> str:
    """Format an alert feature into a readable string."""
    # 提取响应内容,规范输出格式
    props = feature["properties"]
    return f"""
Event: {props.get('event', 'Unknown')}
Area: {props.get('areaDesc', 'Unknown')}
Severity: {props.get('severity', 'Unknown')}
Description: {props.get('description', 'No description available')}
Instructions: {props.get('instruction', 'No specific instructions provided')}
"""
Part3: 将函数打包成 mcp tool
1
2
3
4
5
6
7
8
9
10
11
12
13
14
15
16
17
18
19
20
21
22
23
24
25
26
27
28
29
30
31
32
33
34
35
36
37
38
39
40
41
42
43
44
45
46
47
48
49
50
51
52
53
54
55
56
57
## Part3 MCP tools
# 使用 wrapper(装饰器) @mcp.tool() 整合成工具
@mcp.tool()
async def get_alerts(state: str) -> str:
    """Get weather alerts for a US state.

    Args:
        state: Two-letter US state code (e.g. CA, NY)
    """
    url = f"{NWS_API_BASE}/alerts/active/area/{state}"
    data = await make_nws_request(url)

    if not data or "features" not in data:
        return "Unable to fetch alerts or no alerts found."

    if not data["features"]:
        return "No active alerts for this state."

    alerts = [format_alert(feature) for feature in data["features"]]
    return "\n---\n".join(alerts)


@mcp.tool()
async def get_forecast(latitude: float, longitude: float) -> str:
    """Get weather forecast for a location.

    Args:
        latitude: Latitude of the location
        longitude: Longitude of the location
    """
    # First get the forecast grid endpoint
    points_url = f"{NWS_API_BASE}/points/{latitude},{longitude}"
    points_data = await make_nws_request(points_url)

    if not points_data:
        return "Unable to fetch forecast data for this location."

    # Get the forecast URL from the points response
    forecast_url = points_data["properties"]["forecast"]
    forecast_data = await make_nws_request(forecast_url)

    if not forecast_data:
        return "Unable to fetch detailed forecast."

    # Format the periods into a readable forecast
    periods = forecast_data["properties"]["periods"]
    forecasts = []
    for period in periods[:5]:  # Only show next 5 periods
        forecast = f"""
{period['name']}:
Temperature: {period['temperature']}°{period['temperatureUnit']}
Wind: {period['windSpeed']} {period['windDirection']}
Forecast: {period['detailedForecast']}
"""
        forecasts.append(forecast)

    return "\n---\n".join(forecasts)
本地MCP使用sdio传输方式
1
2
3
if __name__ == "__main__":
    # Initialize and run the server
    mcp.run(transport="stdio")
更多对于 transport 的设置参考 Cursor 的介绍
Cursor 配置
Cursor中支持两种MCP Server的配置:全局配置 / 当前项目配置,这里先介绍全局的配置方式。
全局配置
- 打开 Cursor 的设置:
Ctrl+shift+j/ 右上角齿轮打开 - 左侧 Cursor Settings 列表选择
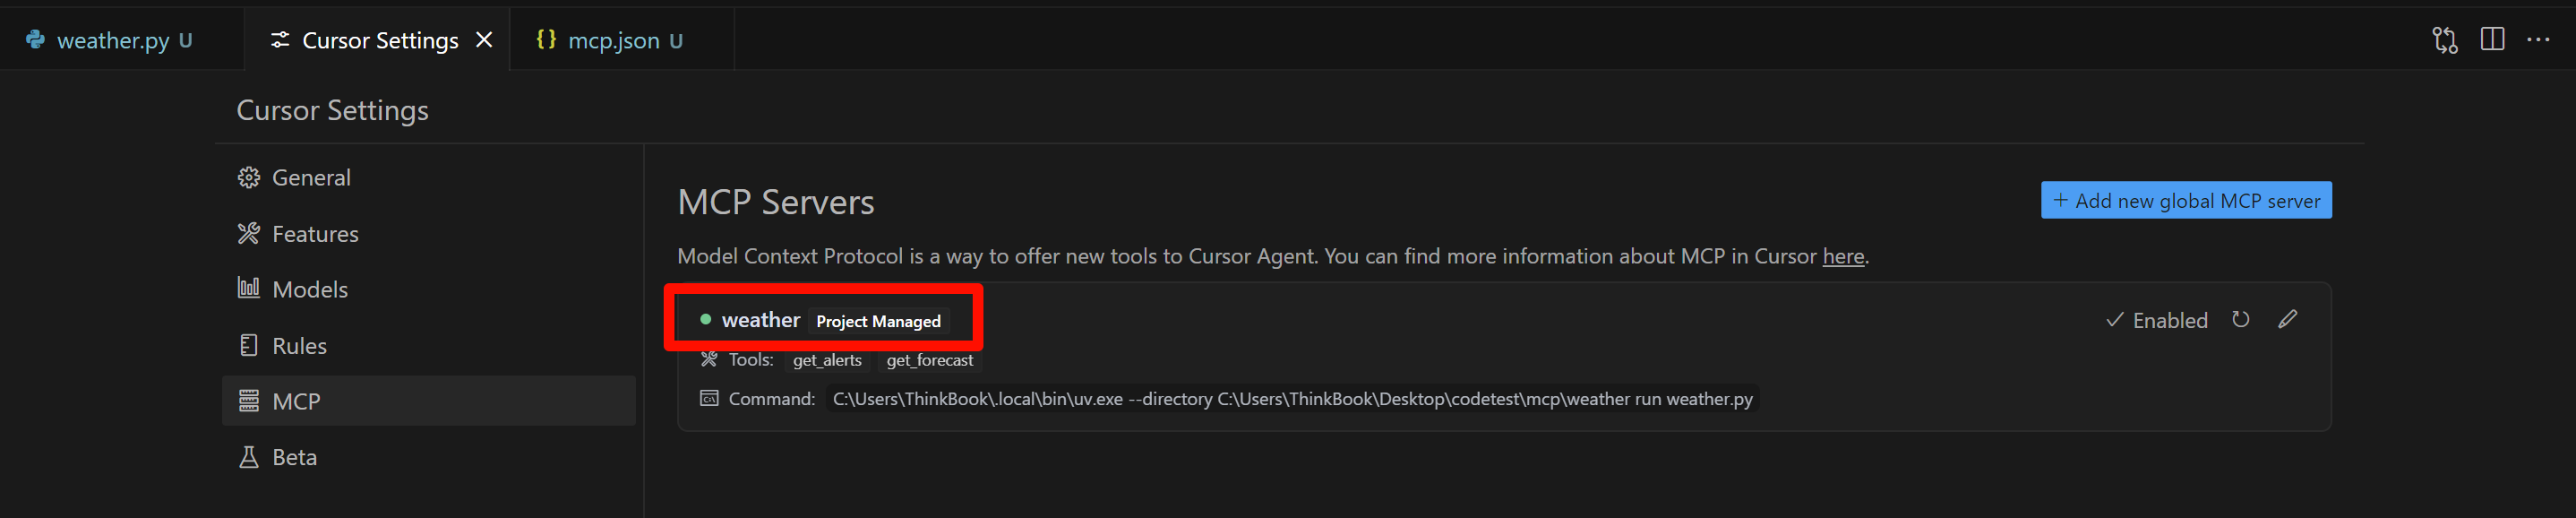
MCP - 点击 MCP Servers 右侧的
+ Add new global MCP server的按钮,会自动在 .local 文件夹(C:\Users\Username\.cursor)下新建一个 mcp.json - 在这里添加 MCP 的配置,以我的配置为例:
1
2
3
4
5
6
7
8
9
10
11
12
13
14
15
{
    "mcpServers": {
      "weather": {
        "command": "C:\\Users\\ThinkBook\\.local\\bin\\uv.exe",
        "args": [
            "--directory",
            "C:\\Users\\ThinkBook\\Desktop\\codetest\\mcp\\weather",
            "run",
            "weather.py"],
        "env": {
          "API_KEY": ""
        }
      }
    }
  }
- 这里要注意:我使用的是 uv,要注意 command 中 uv 路径的指定,以及 args 中参数路径的准确,不然MCP配置会出现错误。
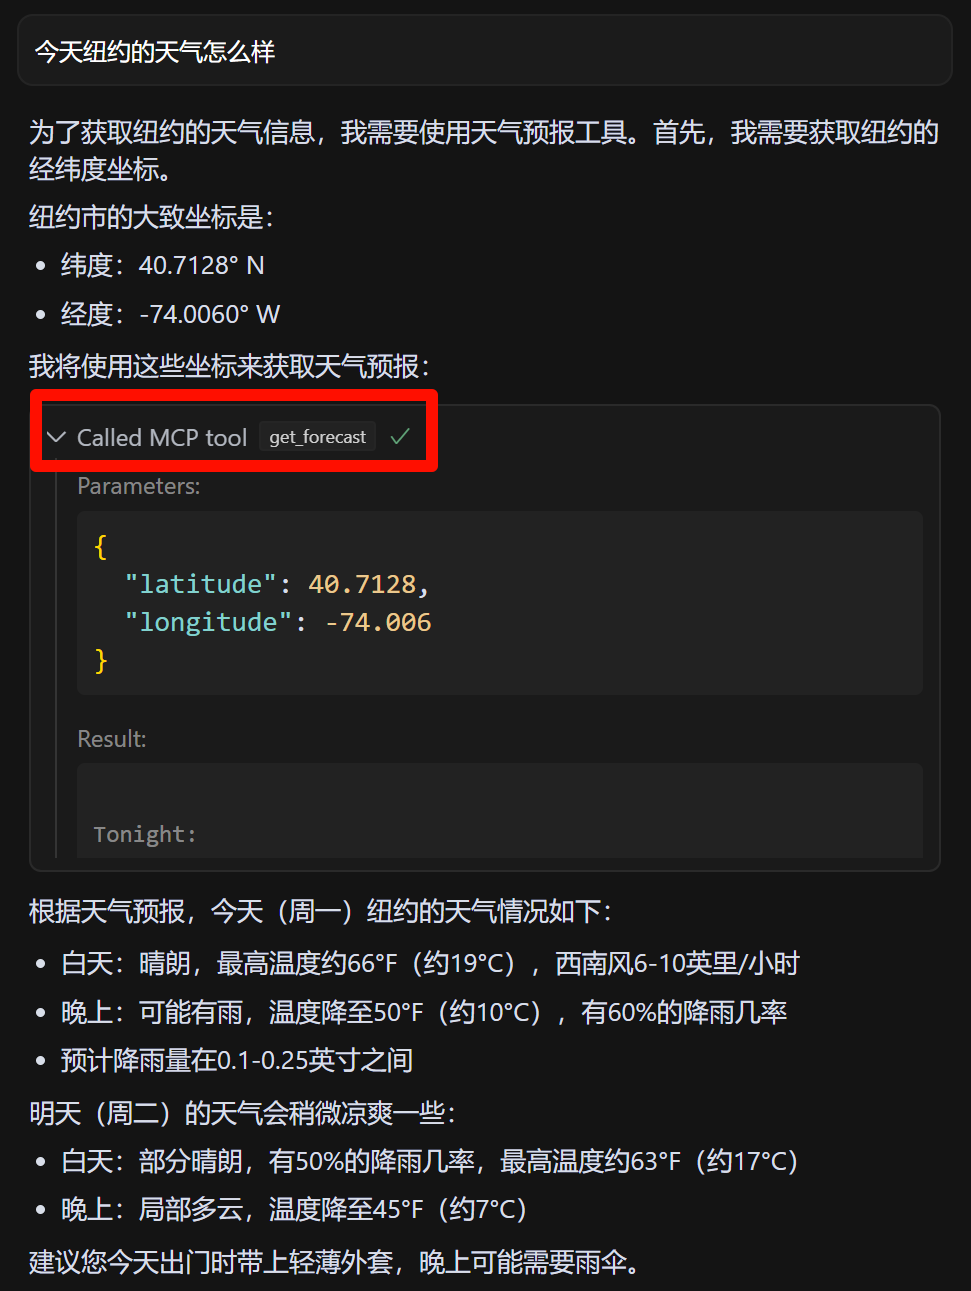
- 配置完成,测试Agent调用,询问天气相关问题
当前项目配置
当前项目与全局配置的区别在于 mcp.json 的创建位置不同,只需将上述的第 3. 步换成,直接在当前项目根目录下创建 .cursor/mcp.json,剩余配置相同。
Thanks
参考:
- MCP 官方文档:https://modelcontextprotocol.io/introduction
- Cursor MCP文档:https://docs.cursor.com/context/model-context-protocol
- Alejandro 视频:https://www.youtube.com/watch?v=Ek8JHgZtmcI
有相关的问题欢迎与我交流!
Emali: w00way.kwong@gmail.com / weihua.kwong@mail.nankai.edu.cn